
A practical, hands-on guide to making your lists pleasant to use
The webinar above is a hands-on walkthrough showing how to go beyond simply creating a list and instead designing an experience that feels intentional, clear, and easy to use. We focused on building a real-world internal company form and demonstrated, using Copilot, just how formatting choices can dramatically improve usability without touching Power Automate or writing complex logic.
The result is a list that looks better, feels easier to use, and gives admins and finance teams exactly what they need.
Follow along using some of the steps outlined below, including some JSON “recipes” to get you started in beautifying your lists, including my Inline toggle JSON “secret burger recipe” that is such a versatile addition to any list.
I encourage you to take the next step and plug my JSON recipes into Copilot to see how you can begin taking these formatting options to the next level in your business. It may take a few tries, a few failures (as you will see in the video) before you get JSON formatting to work the way you need to in your Lists – but trust me when I tell you that it is well worth the effort.
Start with the new List form experience
When you create your list using the new form experience, Microsoft Lists automatically generates your columns based on the fields you add.
Key tips from the session:
- When titling each item in the form, leave no spaces. Please note that you can always update the names of these titles with spaces in the List after the fact. This is to ensure your Internal column name is easy to call upon in your JSON formatting when needed.
- Take advantage of new internal field types like People and Image
- Use emojis and colour where available, especially in Choice fields
- Submit a few test items early so you can see how the list behaves in practice
A little planning here saves a lot of rework later.
Here are the Form questions I used to produce the beautified version of the list in the video:
- Submitted For (People)
- Expense Name (Title)
- Expense Type (Choice)
- Date of Expense (Date)
- Is GST Included? (Yes/No)
- Receipt Total (Currency)
- Upload Receipt (Photo)
Beautifying the list view itself
Once the form is in place and you have real items submitted, the focus shifts from data capture to readability.
Small view changes that make a big difference
- Update the view to fixed height
- Rename the default view to something meaningful like New Receipts
- Move columns into a logical order rather than accepting the default
- Important: Save the view after making changes using Save as view
These small decisions immediately change how usable the list feels.
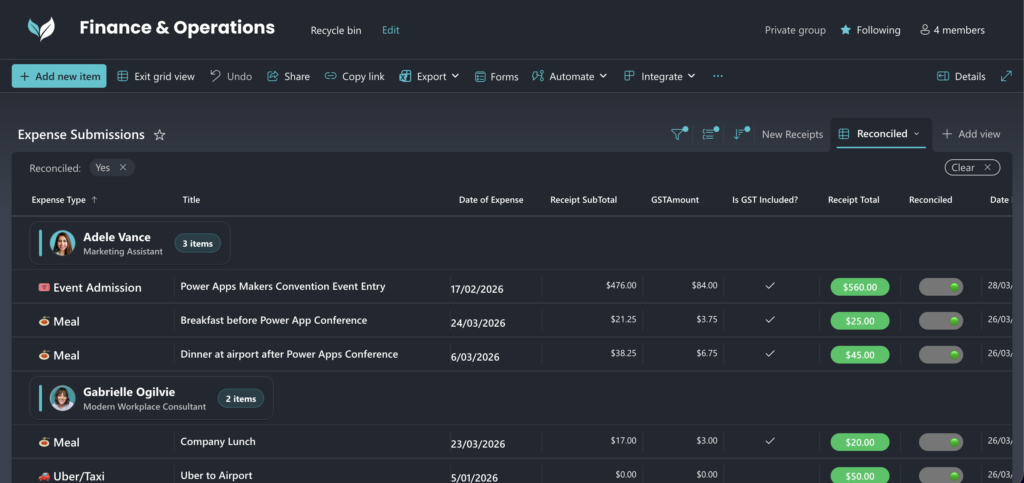
Making People columns work harder
People columns are one of the most underused features in Lists.
In this session we:
- Enabled profile photos directly in the People column
- Grouped items by the People column to visually cluster submissions (please follow the instructions in the video)
- Edited and beautified the grouping header using the View Formatting to make groups clearer, while improving the look of the List.
People grouping header JSON
If you are grouping your list according to a People column like we have in the video, here is a really good JSON formatting to use in the List View (please follow the steps in the video)
{
  "$schema": "https://developer.microsoft.com/json-schemas/sp/v2/view-formatting.schema.json",
  "groupProps": {
    "headerFormatter": {
      "elmType": "div",
      "style": {
        "display": "flex",
        "align-items": "center",
        "padding": "10px 12px",
        "margin": "6px 0",
        "border-radius": "12px",
        "background-color": "#222831",
        "border": "1px solid #343b46",
        "box-shadow": "0 1px 0 rgba(0,0,0,0.35)"
      },
      "children": [
        {
          "elmType": "div",
          "style": {
            "width": "4px",
            "height": "36px",
            "border-radius": "4px",
            "background-color": "#27c2c7",
            "margin-right": "10px"
          }
        },
        {
          "elmType": "img",
          "attributes": {
            "src": "='/_layouts/15/userphoto.aspx?size=M&accountname=' + @group.fieldData.email",
            "alt": "=@group.fieldData.title",
            "title": "=@group.fieldData.title"
          },
          "style": {
            "width": "34px",
            "height": "34px",
            "border-radius": "50%",
            "margin-right": "10px",
            "border": "1px solid rgba(255,255,255,0.14)"
          }
        },
        {
          "elmType": "div",
          "style": {
            "display": "flex",
            "flex-direction": "column",
            "min-width": "0",
            "padding-right": "16px"
          },
          "children": [
            {
              "elmType": "div",
              "txtContent": "=@group.fieldData.title",
              "style": {
                "font-size": "16px",
                "font-weight": "700",
                "color": "#ffffff",
                "line-height": "1.2",
                "white-space": "nowrap",
                "overflow": "hidden",
                "text-overflow": "ellipsis"
              }
            },
            {
              "elmType": "div",
              "txtContent": "=if(@group.fieldData.jobTitle == '' || @group.fieldData.jobTitle == 'Unassigned', '', @group.fieldData.jobTitle)",
              "style": {
                "font-size": "12px",
                "color": "rgba(255,255,255,0.70)",
                "margin-top": "2px",
                "white-space": "nowrap",
                "overflow": "hidden",
                "text-overflow": "ellipsis",
                "display": "=if(@group.fieldData.jobTitle == '' || @group.fieldData.jobTitle == 'Unassigned', 'none', 'block')"
              }
            }
          ]
        },
        {
          "elmType": "div",
          "style": {
            "margin-left": "auto",
            "padding": "4px 10px",
            "border-radius": "999px",
            "background-color": "rgba(39,194,199,0.14)",
            "border": "1px solid rgba(39,194,199,0.25)",
            "font-size": "12px",
            "font-weight": "700",
            "color": "#ffffff",
            "white-space": "nowrap"
          },
          "txtContent": "=@group.count + if(@group.count == 1, ' item', ' items')"
        }
      ]
    }
  }
}
This is one of those changes that users instantly notice 
Adding status with an inline toggle
Instead of showing “Yes” or “No” as a tickbox column (we call it a Boolean in code speak) as is default when added to a List, we added a Reconciled Yes/No column that we formatted as a toggle that can be ticked “inline” (which means you can tick it without needing to click “edit in grid view” – this is huge).
This toggle is a JSON that I have brought with me from work I have done in previous businesses because it is so versatile, can be used multiple times over in the same list, is visually appealing and it is immediately understandable no matter who is looking at the List.
No flows, no automation. Just JSON formatting.
Inline Yes/No toggle JSON
I call this my secret in-line toggle burger sauce recipe.
IMPORTANT: Find and replace “Reconciled” with the internal name of your Yes/No column before pasting this JSON into your column formatting:
{
"$schema": "https://developer.microsoft.com/json-schemas/sp/v2/column-formatting.schema.json",
"elmType": "div",
"style": {
"display": "flex",
"align-items": "center",
"justify-content": "center",
"height": "32px"
},
"children": [
{
"elmType": "div",
"style": {
"display": "flex",
"align-items": "center",
"justify-content": "=if([$Reconciled], 'flex-end', 'flex-start')",
"width": "60px",
"height": "24px",
"border-radius": "12px",
"background-color": "=if([$Reconciled], '#767676', '#767676')",
"transition": "background-color 0.3s, justify-content 0.3s",
"cursor": "pointer",
"box-sizing": "border-box",
"padding-left": "4px",
"padding-right": "4px"
},
"customRowAction": {
"action": "setValue",
"actionInput": {
"Reconciled": "=if([$Reconciled], false, true)"
}
},
"children": [
{
"elmType": "span",
"txtContent": "=if([$Reconciled], ' ', '
', ' ')",
"style": {
"height": "16px",
"width": "16px",
"border-radius": "50%",
"display": "flex",
"align-items": "center",
"justify-content": "center",
"font-size": "12px",
"line-height": "1"
}
}
]
}
]
}
')",
"style": {
"height": "16px",
"width": "16px",
"border-radius": "50%",
"display": "flex",
"align-items": "center",
"justify-content": "center",
"font-size": "12px",
"line-height": "1"
}
}
]
}
]
}
This single enhancement turns a boring Boolean field into something that feels interactive and intentional.
Calculated columns without Power Automate
To show how much you can achieve natively in Lists, we added several calculated columns using Copilot and simple formulas.
To add these columns, we click into List Settings from the gear icon top right on the List, and then scroll down to Create Column, and within select Calculated Column (and then currency or date column within that, depending on the type of calculated column you need)
Calculated columns created:
- GST Calculated
- Receipt Subtotal
- Date Reconciled
Please use the selection tool on the right of the column formatting to replace the below [Column Title] with your respective column titles:
GST Calculated:
=IF([Is GST Included?]=TRUE,[Receipt Total]*0.15,0)

Receipt Subtotal:
=IF([Is GST Included?]=TRUE,[Receipt Total]-GSTAmount,0)

Date Reconciled:
=IF(Reconciled=TRUE,TODAY(),"")
We then:
- Hid the Is GST Included? column from the view while keeping it on the form
All of this reinforces that Lists can handle lightweight logic cleanly without additional PowerAutomate tooling. We encourage you to leverage Copilot to figure out any other complexities you would like your calcuated field to achieve.
Receipt Total pill JSON
The quick JSON formatting trick you could apply in this particular List is to add a pill behind the Receipt Total that goes from grey to green when the item is Reconciled.
To do this, I matched the styling of the Inline toggle.
Please note that you will need to find and replace the Receipt Total column with the internal name of your Receipt Total column, and same with the internal name of your Reconciled column. Then, apply this JSON to your Receipt Total column formatting.
JSON formatting for Receipt Total
{
  "$schema": "https://developer.microsoft.com/json-schemas/sp/v2/column-formatting.schema.json",
  "elmType": "div",
  "style": {
    "display": "flex",
    "align-items": "center",
    "justify-content": "center",
    "height": "32px"
  },
  "children": [
    {
      "elmType": "div",
      "style": {
        "display": "flex",
        "align-items": "center",
        "justify-content": "center",
        "width": "80px",
        "height": "24px",
        "border-radius": "12px",
        "background-color": "=if([$Reconciled] == true, '#22c55e', '#767676')",
        "box-sizing": "border-box",
        "padding": "0 10px",
        "overflow": "hidden"
      },
      "children": [
        {
          "elmType": "span",
          "txtContent": "[$Receipt_x0020_Total.displayValue]",
          "style": {
            "max-width": "100%",
            "white-space": "nowrap",
            "overflow": "hidden",
            "text-overflow": "ellipsis",
            "font-weight": "600",
            "font-size": "13px",
            "line-height": "20px",
            "color": "#00000"
          }
        }
      ]
    }
  ]
}
Multiple views for different audiences
Rather than forcing everyone into one experience, we finished by creating purpose-built views.
- A Reconciled view based on the original view, with a filter applied that only shows items that are Reconciled
- Renamed All Items (default view) to New Receipts
- Column widths saved per view
Final thoughts
Beautifying Microsoft Lists is not about making things pretty for the sake of it.
It is about:
- Reducing cognitive load
- Making status obvious at a glance
- Designing for the people who use the list every day
With a mix of good form design, smart views, and targeted JSON formatting, you can transform a basic list into something users actually enjoy working with.
If you want help applying these techniques, especially around permissions, governance, or more advanced formatting, that is where a deeper conversation is worth having with us. Please email ian@custom365.co to discuss your needs.
And yes, Copilot helps, a lot. Make use of it!